Digitech Docking Station Sata Hdd Drivers
Picktorrent: freenas i386 embedded - Free Search and Download Torrents at search engine. Download Music, TV Shows, Movies, Anime, Software and more. There is more related torrents.freenas amd64 livecd iso freenas amd64 embedded img freenas amd64 checksum.freenas amd64 livecd iso direct download.freenas i386 livecd.7.1.iso 72.0mb, sha256, 17, a new stable version of the specialist live cd designed for hard. Freenas I386 Livecd 0 7 2 5372 » 2010-09-25 130.90 MB 1 0 Freenas I386 Livecd 0 7 1 4944. Freenas Amd64 Livecd 0. Freenas i386 livecd 0 7 1 4944 iso. 0 0 70.00 MB 0. Comments (0) RECENT SEARCHES search cloud » Anger Management S02E48 REPACK HDTV x264 KILLERS rarbg. Download free freenas i386 livecd 0 7 1 4944 iso software. Freenas I386 Livecd 0 7 4415 Iso torrent download Mar 16, 2009 Download Freenas I386 Livecd 0 7 4415 Iso via bittorrent at linux23.com in category Linux software! 0 Comments Leave a Reply.
The Plugable USB 3.0 SATA Hard Drive Docking Station is a convenient way to connect SATA hard drives to any computer with a USB port. It’s compatible with both USB 2.0 and 3.0 and either 2.5″ or 3.5″ drives. Becuase the drivers are included in all major operating systems it’s as simple as plug and play so there’s nothing to install.
If you do have problems, there are many different issues that can cause your SATA Dock to misbehave – among them are drive format, disk failures, and permissions issues. This troubleshooting guide will help you through the process of getting your USB3-SATA-U3 up and running at USB 3.0 speed. Initial Setup — The first step is to connect your SATA Dock to AC power and to an active USB port. With no drive inserted you should see the green light illuminated like this. The ‘A’ and ‘B’ ends of a USB 3.0 cable. Download emerald hack rom. We’ll start with the USB 2.0 cable.
Jul 24, 2012 Hello, I have a digitech model XC4690 docking station, I am trying, well attempting to format a faulty HDD which came out of a laptop. As I am typing this the internal HDD is in the dock and the power is on, it is a separate power source and is plugged in via usb.
Once we have everything working on USB 2.0 we’ll move up to USB 3.0 – if it’s available on the host computer. Connect the USB 2.0 cable to the docking station and to a known good USB port on your computer. To verify that the port is working, test with a simple device like a wired USB mouse. Windows troubleshooting steps — click for.
First power off the dock and insert the drive. The Plugable USB3-SATA-U3 Hard Drive Docking Station is compatible with both 2.5″ laptop sized drives and 3.5″ desktop sized drives. Be sure to line up the connectors inside the slot with the connectors on the drive and push the drive into the slot firmly until it seats on the connector. Once your drive is installed, power on the dock with the switch on the back. After a minute or so, you’ll see an “installing new hardware” message and if the drive is recognized and mounted successfully you’ll see this.
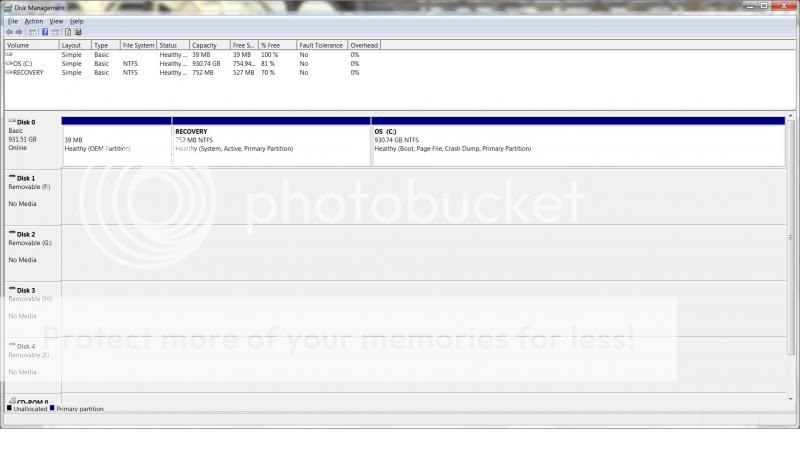
Click on image to enlarge. You should see the disk listed, probably as unallocated space. Right click on it and choose “New Simple Volume”. Follow the wizard to format and initialize your new disk. Once the wizard finishes, your disk will be available to Windows.
Simply open Windows Explorer, it will be listed under “Computer” in the list of available drives. If your machine is equipped with USB 3.0, we can now safely eject the drive and reconnect it with the USB 3.0 cable to a USB 3.0 port on your computer. To do this click on the USB icon in the lower right of the screen and select “Eject MassStorage Device”. Using the USB 3.0 cable that came with your USB3-SATA-U3 Hard Drive Docking Station, connect your dock to a USB 3.0 port on your computer. Your USB3-SATA-U3 dock should now be operating at USB 3.0 speed. If you are having problems getting your docking station working on USB 3.0, first make sure it’s working on USB 2.0.
This will verify that the drive is properly formatted and functional, the power supply is good and the USB 2.0 cable and port are both good. Contact us at support@plugable.com if you have any trouble. Mac troubleshooting steps —.
Click image to enlarge. If your drive is not detected, use Disk Utility to investigate. First check that the disk is showing up, then click verify. If the system is able to verify the disk it should be accessible to finder. If not, select Partition.
Be aware that this action will erase any data that is currently on the disk. Choose a partition layout and select apply. Your new disk should now be available. If your Mac has USB 3.0 ports available, you can now connect your dock with the USB 3.0 cable. If you are having trouble getting your SATA dock running, contact us at support@plugable.com. Please feel free to comment with your thoughts, suggestions or experiences, thanks! Hi, I’ve been using this dock for over 6 months now, but I have never been able to connect it at USB 3.0 speeds.

I use Win 7 64bit, and my motherboard has 4 USB 3.0 ports, I also have an add-on card with another 2 USB 3.0 ports. Does not matter where I connect I always get a message saying “This device can perform faster.